I've recently received a link from my school about the PCR song from bio-rad.
The song is so cute!
For those who don't know what PCR is, it's short form for polymerase chain reaction. It is a technique used to amplify a piece of DNA to produce more copies of it for further testing. It's an amazing technique used for many purposes such as genetic fingerprinting or genetic analysis.
Here's the music video:
Here are the lyrics:
There was a time when to amplify DNA,
You had to grow tons and tons of tiny cells.
Then along came a guy named Dr. Kary Mullis,
Said you can amplify in vitro just as well.
Just mix your template with a buffer and some primers,
Nucleotides and polymerases, too.
Denaturing, annealing, and extending.
Well it’s amazing what heating and cooling and heating will do.
Chorus:
PCR, when you need to detect mutations.
PCR, when you need to recombine.
PCR, when you need to find out who the daddy is.
PCR, when you need to solve a crime.
(repeat chorus)
Thanks Bio-Rad for such a cute and wonderful song (:
Saturday, April 26, 2008
Friday, April 18, 2008
Experiment - Blood type and Rhesus testing
As a timid person, pain terrifies me.
Before the experiment yesterday I knew that someone from the group would have to "sacrifice" to donate a little blood from his/her finger to do the blood type testing experiment in genetics class.
The objective was to demonstrate the principles of blood grouping and mendelian genetics. And to check out how testing can be done.
Even though there was a guy in my group, I didn't know what my blood group was, so I thought I should volunteer. Apparently, up till my batch, we no longer have to test our blood group for our identification card, and there was also no record of my blood group on my birth certificate, plus being in a single parent family, I know my mum's an O, which means I will definitely inherit one of her Os, but I dunnoe what's the blood grp of my dad. So I prepared myself for the experiment.
I was so freaking out before the experiment, as the teacher was explaining the procedure.
I looked away as my friend pricked my middle finger on my left hand with the lancet. I kept telling myself as I was looking away that it's just going to be like an ant's bite. An ant's bite. Nope, it felt more like a cut. Which it really was. Seeing as I used to work in a pharmacy and got myself lots of cuts from packing medications, it felt like another work accident. But it was quite painful though.
My friend then drew blood that came out blob-like (I had to squeeze my finger so that she can draw using the micropipette). Interestingly though, I gave more than was required. I was afraid there might not be enough or like in case something happens. I won't want to prick my finger again.
We did two kinds of testing too, a blood group testing and rhesus testing. And with two different methods, one that was fast and another that would take an hour.
It was cool at the end of it actually. Coz I found out what's my blood group and rhesus! Saves me a trip to the doc plus I felt much braver after that too.
Thank God He gave me that courage (:
Friday, April 04, 2008
Results are in!
Let's take a look at our results from the lab:
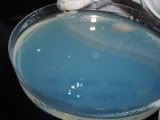
1. My hand imprint

As you can see, even though I've washed my hands before I did this, there is still a mixed colony of bacteria. But at least still clean because it's not a lot.
2. Serial dilution
I will only show dilution 10^(-2) plate and dilution 10^(-5) plate for comparison:

10^(-2)


4. Gram staining
Sadly, I haven't gotten the gram staining pics from my other friend who took the photos, but I will post them once I get them.
I am really satisfied with the results and can't wait for the next session (:
1. My hand imprint

As you can see, even though I've washed my hands before I did this, there is still a mixed colony of bacteria. But at least still clean because it's not a lot.
2. Serial dilution
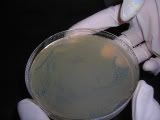
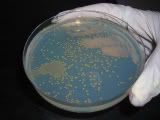
I will only show dilution 10^(-2) plate and dilution 10^(-5) plate for comparison:

10^(-2)

10^(-5)
As you can see, the colonies on 10^(-5) look easier to count. But we'll only be counting them in the next lab session.
3. Streaking
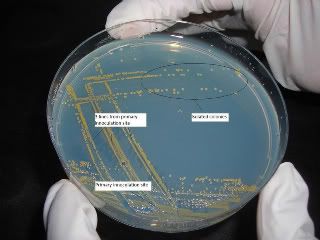
The streaking was done pretty well by my friend, as isolated colonies were observed:

4. Gram staining
Sadly, I haven't gotten the gram staining pics from my other friend who took the photos, but I will post them once I get them.
I am really satisfied with the results and can't wait for the next session (:
Wednesday, April 02, 2008
Lab experiment with Staphylococcus auerus
I had a very interesting lab session in school last night.
There were four experiments conducted during the session:
1. I volunteered for the first one where I had to imprint my fingers onto the nutrient agar to kind of culture and see the different kinds of bacteria that were on my fingers. The agar was to be incubated at 37 degrees C, for 24 hours.
2. The second experiment was to do a serial dilution using a Staphylococcus aureus culture and then do a spread plate from the dilution tubes 10^(-5), 10^(-4), 10^(-3) and 10^(-2).
The way to do dilution is to firstly pipette 1ml of pure culture from a sample of S. aureus and then transfer that to another tube containing 9ml of water. This tube will be labelled as 10^(-1). From this 10^(-1) tube, another 1 ml of this mixture is drawn and placed in a new tube containing 9ml of water, this tube will be labelled as 10^(-2).
The same method continues until a 10^(-5) tube is obtained. So from tubes 10^(-2) to 10^(-5), 1 ml from each tube is drawn and expelled onto a nutrient agar plate each, and using a hockey stick (not the big one used for playing, but a small one that looks kind of like a straw that is bent at the top), the mixture is spread around the plate and they will again be incubated at 37 degrees C, for 24 hours.
The purpose of dilution is so as to make the colonies so called "countable" because if you spread and grow the undiluted culture, there will be too many colonies to count. But if you dilute them step by step, it makes them more countable. And after the colonies are counted, calculations will be done to estimate the number of bacterial/ml in the sample. This is known as bacteria enumeration.
3. The third experiment of the session was to do a streak plate. Streaking is a method used to isolate separate bacterial colonies from a culture. This is somewhat similar to dilution. There must first be a primary innoculation site, where a culture is taken using a sterilised loop and streaked many times on one part of the agar plate, another sterilised loop is used to draw abt 3-4 lines from the primary innoculation site (the plate turned 90 degrees), and another sterilised loop will draw another 3-4 lines from those 3-4 lines, the last part will be to use another sterilised loop to do a streak from the previous 3-4 lines, care must be taken not to touch the primary innoculation site. The same loop can be used but has to be sterilised using the aseptic technique of flaming the loop. But for my class, we used plastic sterilised loops, so we didn't have to flame them, or they might melt haha.
The difference between serial dilution and streaking is that serial dilution is used to estimate the number of bacteria per ml in the culture while streaking is used to isolate a single colony.
4. The last experiment of the session was to do gram staining, this experiment is one of the coolest i've ever done because gram staining, stains the bacteria to show what type it is (is it gram positive (purple) or gram negative (pink)?), and the shape, size and how they group together. Since the bacteria used last night was Staphylococcus aureus, Staph actually means cluster, and coccus is like grape-shaped, and since it is a gram positive bacteria, it should also be purple colour. And what we saw was indeed, grape-shaped purple bacteria clustered in groups.
When we did it the first time, we couldn't see anything under the microscope, probably coz I placed too little an amount onto the slide, so it could have been all washed off when we did the staining. So we tried again, and I was so happy and excited that we could actually see them, lol, believe me, all of us took turns to try and focus here and there but couldn't see anything (except probably the hair from someone that fell onto the slide haha), and finally when we could, it was like a Eureka moment. lol.
Anyway, all these would sound more exciting if there were pictures, but i'll only be going back to check on them on Friday. So be sure to check back here after Friday for the photos and further explanations!
Oh yeah, this is actually for a developing professional skills module, and so we learnt the various techniques related to microbiology work.
I am also taking the microbiology module this term, and let me tell you, the lab was even more exciting. But again, we will only have the chance to check on our plates in the next session, so I will blog about them when the time comes. The micro-organisms we used that time was more than just Staphylococcus aureus. We also used Saccharomyces cerevisiae (or baker's yeast), Bacillus cereus (close family with Bacillus anthracis [causes anthrax]. They produce endospores which are harmful to us), and also Klebsiella pneumoniae. For that session, one experiment allowed us to choose one of these micro-organisms to learn streaking, and I chose K. pneumoniae, I shall take a picture and post it here if it looks ok, haha, after I take a look at the plate.
Subscribe to:
Comments (Atom)